Building your own catamaran is another option to getting into your own boat.
In this page we will go over the advantages, considerations, and a detailed
history and journal of our boat-building adventure with Light Wave.
We hope this will give you a clear picture of what lies ahead if you go this
route, including:
- Construction methods
- 9 essential design features
- Review of the four leading catamaran
designers for home builders - Construction times
- Budget: How much did it cost
to build a basic cruising catamaran? - Layout of our catamaran, LightWave,
and lots of pictures - Carllie’s article from September 2000 Multihulls Magazine:
“The Boat Builder’s Wife“ - Equipment outfitting
- Radio and communication outfitting
- Dinghy selection and considerations
- Having a boat custom-built for you
Because of the huge dollars needed to buy a new or even a used catamaran, we
would never have gotten a catamaran if we hadn’t built it ourselves.
Let’s start by saying that building any type of larger boat, especially a
catamaran, can be one of the most intellectually and physically challenging
things you will ever do.
It has
been said that building a large boat is the closest a man can come to giving
birth to a baby. In other words there is going to some discomfort and pain along
the way; you will question yourself on whether this was such a good idea; it’s
very difficult to reverse the decision; and though friends will support you,
you will be on your own most of the time with your significant other if he/she
is game.

There are several big pluses to building your own boat.
Know your boat
You will intimately know every part of your boat. You will know where every
wire, hose, bolt, bulkhead, rib, and support is because you installed them!
Pride of ownership
We have often thought what it would be like to just buy a boat from a manufacturer,
and know that while owners who have spent a lot of cash (or future life to pay
off the lien) their often possessive and competing-with-the Joneses could not
begin to compare to our quiet glow of happiness and akinship we feel with Light
Wave.
Our boat is like part of the family. So much time was spent on her that we
have a major emotional investment. Every time we see our vessel – from a distance
at anchor or approaching her in our marina, we say, “What a pretty boat!
I can’t believe we built it!” Then that sense of accomplishment settles
back in and we feel we have indeed earned the privilege of all of the beautiful
experiences we have had sailing, cruising, exploring the beautiful BC Coast
and much further a field (or should we say “an ocean”?).
Save money
You will be able to pay for the materials as you go and “donate”
your time to the cause.
Get a newer design
Many of the production boats that are out there are designs of many years
ago because the manufactures have to recoup their capital investment on the
mold and production setup. When you build your own you have much newer designs
to draw from.
Details on Our Boat Building Adventure
 Where
Where
do we start? First of all, Carllie has her own version of events and the process
and her story, called the in “The
Boat Builder’s Wife“, appeared in Multihulls Magazine in Oct 2000.
So here is my version of it:
We had sailed our first boat Wave Dancer for five
years and had many adventures on the British Columbia coast. In May 1996, I
had just returned from a little one-week solo trip in the Gulf Islands of BC
when I bought the book, The Cruising Multihull by
Chris White (Future link to book review on our web site).
This is the book that got me going (Carllie was not yet convinced). I must
have read it a half dozen times over the next 6 months, each time becoming more
convinced that this was the way to go for our next boat. It was really still
pre-internet web site days so I wrote to all the designers that were listed
in the back of the book. Over the next several weeks packages of information
started appearing in the mailbox (there is just something about getting packages
in the mail – I guess it’s the anticipation). I would pour over these
preliminary printed pages with pictures and accommodation layouts. Next, I put
a few dollars down to buy the information packages and study plans from the
top prospects.
 I should
digress to explain that we had never sailed a cruising catamaran. Our only experience
with multihulls consisted of some summer sailing on a 12-foot AquaCat beach
cat, definitely first generation. It went about 6 knots and that was it. My
only other experience was when I was in my early teens back in Montreal: my
father had bought this little bathtub-like trimaran about 10 feet long. I don’t
remember the make. It didn’t go very fast. The most fun we had with it
was trying to get the bows to plow under while sailing so the cockpit would
fill with water (I must see if I can get a picture of it out of the family archives…..).
I waited patiently for the study plans. It was like the night before Christmas
when I was kid. Oooh the wait! Finally they came, and again I carefully scrutinized
the next level of detail. Things were getting a little more serious. The top
contenders were:
- Richard Woods
- Chris White
- James Wharram
Click here to read my comments and reviews
on their catamaran designs as well as
those of Jeff Schionning.
I remember initially drooling over the Atlantic 42 by Chris White, still one
of my favorite designs. It seemed to be so seaworthy (by the way if I run into
about $800,000 USD any time soon, I am going to buy an Atlantic 55). The most
important piece of advice that came out of the material was from Richard Woods:
“Build the smallest boat you‘d
be happy with it.”
 What
What
does that mean? Each page in these plan books covers one design. Though there
are differences in the accommodation plans, they are all scaled to fit a single
page. You look at this 35 footer and you go “Wow! Doesn’t this look
nice?” The little 30 footer doesn’t seem to be as good and so forth.
Since they are each one page the one thing that doesn’t really come across
is how much more work is that 35 footer over the 30 footer! This brings me to
Garett’s #1 axiom of catamaran boat building:
Axiom #1: The hours to build a catamaran is
in almost in direct proportion to its weight.
Which brings us to Axiom #2:
Axiom #2: It takes about 1 hour to create
1 pound of finished boat.
In our case we spent 3,500 hours (click
here for full details on the construction hours) to build a 4,000 lb. boat
(just a little less than 0.9 hours per pound). If a boat’s empty weight
is 8,000 lbs., it will probably take about 6,000 hours to build.
When you think about it, you can only mix and handle so much material per
hour. More boat weight, more material, more hours. Sure there are some economies
of scale on a bigger boat, but usually the systems become more complex and these
take longer to install.

Anyway, back to the decision process: Richard Woods out of England included
a video in his design package. I guess this is what sold Carllie and I on his
designs. Using Richard’s axiom of “Build the smallest boat you’d
be happiest with,” we compared his 30 foot Sagitta with his 28.5 foot
Gypsy. In the end the fact that Gypsy could be built in components swayed us
to pick that one. Many of the initial parts and components could be built in
a garage.
This decision process took 8 months and I figured we’d launch in 6 months.
It was now January of 1997. Little did we know it would be 26 months and 3,500
hours between the two of us until we launched on June 5, 1999. We ordered the
full plans and we were off and running.
We were ready to build, but where would we start the process? First of all,
we live in a tiny 480 sq. ft. apartment in Vancouver. Back-yard building wasn’t
exactly an option so I found a small garage nearby that we rented for 5 months.
 I had
I had
some wood delivered and lots of epoxy and on Sunday, February 23, 1997, the
day before my 40th birthday, I cut and glued the first pieces of wood which
would eventually make up the mast beam. Over the first few months, it didn’t
really seem like I was building a boat. Most of the stuff at the beginning were
small things. It was like I was building a model.
After about 4 months in the garage, I had made all the small parts and it
was time to build the hulls. This meant that we had to go larger facilities.
We found space at Shelter Island Marina and Boatyard in Richmond. This is the
biggest boat yard in the Vancouver area with dozens of commercial and private
projects, big and small, under way.
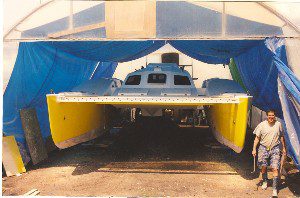
 I went
out and bought one of these big hoop greenhouse buildings. Since the boat was
29′ by 18′, I thought that a building 36′ by 24′ would give enough room around
the boat. I took a week off work to erect our shed. I had a couple friends help
me for a day and then we covered it with some heavy plastic. When the building
was completed and we walked inside it really hit me, “Wow! this is big!
It’s like a covered football stadium! We are going to build a boat that
is going to fill this?” By the way we discovered it’s better to use white
opaque tarps rather than the clear plastic we used – which definitely creates
a greenhouse effect in summer!
We were out of money by then, so we sold our first boat so we could buy resin
and fiberglass. It was a traumatic time as we said goodbye to our beloved Wave
Dancer. We were now committed. We than had all the foam for the
hull cores, barrels of resin, and huge rolls of matting and roving needed for
the fiberglass skins delivered to our “domed stadium”. We kicked
ourselves many times that we didn’t take a picture of this raw material stacked
in one corner of the empty shed, so we could later show “before” and
“after” photos. It was time to build the hulls.
 Up to that
time I had done most of the work in the garage on my own. It was at this time,
July 1997, that Carllie and I really started to work as a team as we learned
to laminate the hull sides on our big flat mold. We worked every night after
work and every weekend. Over the next 6 weeks we made all the hull panels and
bonded them all together over the bulkheads. We had friends come out to help
turn the hulls. By the end of August, we had two open hulls sitting in our boat
shed.
Over the next several months we proceed to join the hulls with the beams I
had built in the garage, and then to install the cuddy cabin, cockpit, and decks.
By the spring of 1998, it was staring to look like a catamaran. Through the
spring and summer of 1998, we continued with the major structural components:
mini-keels, hatches, stairs, and interior. Then we went on to the very laborious
work of fairing the boat before painting. Don’t under estimate that job!
 All
All
through our boat building, Carllie kept reminding me (nagging?) that she didn’t
want our boat to look “homemade”. With that motivation, I kept fairing
and sanding and fairing and sanding…..
By October 1998 we were ready to prime the boat and start painting. I really
thought this would go quickly. I forgot that I would have to do two
more complete sandings to sand off and finish the two layers of primer
application. In addition we had to fill countless pinholes – a laborious process
somewhat like hiking up a mountain – each time you get to what you think is
the top, you see another summit!
The boat seemed to get bigger and bigger. Believe me, there is a lot of surface
area on a catamaran. I clearly remember that last sanding: I had reached the
end of my physical and mental endurance – I was exhausted. I was ready to move
on to the next phase – any phase but more sanding!
We now started spray-painting the hulls bright yellow. It was around this time
we decided on our boat name of Light Wave. The painting
took over a month: the hulls being the easy part, it was the topsides, the nonskid,
and all the masking and prep that seemed to take forever. Happily, the worst
of the dust was gone.
By March 1999 we were in the home stretch. The center bridge deck cabin was
completed so we took a week off from our paid jobs and lived on the boat in
the shed so we could work all day and not waste time commuting. March, April
and May were frantic months as we finished all the final touches: engine installation,
rudders, windows, deck fittings, electrical, plumbing, mast, and rigging. See
our outfitting page (for more details on what we picked and why, and things
we would do differently now.
Initially, our electronic systems were relatively basic but included GPS and
autopilot see the following link for all our electronic
outfitting choices and reasoning for more details.
It was May 22, 1999 and we decided that Saturday, June 5th would be “Launch
Day” so we could send invitations to all of our friends. On the Friday
night before Launch Day, we still had a number of final things to do, many of
them outside. Unfortunately it was pouring rain. We were tired and very wet
but the boat had to go into the water next day so we persevered on till everything
was ready.

Launch Day finally arrived! We have been to several boat launches over the last
10 years and they are very special times. Just recently we were even at one
where there was a full marching! We didn’t have a band but we did have many
friends! It became a truly grand day as the skies cleared with a blustery wind
and 40 friends joining in the festivities. A couple of short speeches and then
we were ready to launch.
The moment of truth came as Light
Wave was lowered into the water. While still in the slings
of the Travelift, I jumped aboard to check for leaks. Of course there weren’t
any! More food and laughs and tours of the boat for all attending. It was a
great day.
Emotionally drained that night, we slept in Light Wave
in the water for the first time. It was another week before we actually went
out for our first trip as we had to sell the shed, setup sails, and install
some final deck hardware.
 There is
more to write tell, about so check back over the next few weeks as I add to
this page.
To sum it up, building a catamaran was a great experience. We learned a lot.
Carllie and I grew closer together through it all. We had a great time doing
it. We had a beautiful catamaran to show for it. Now it was time
for a catamaran adventure!